Wednesday, June 26, 2013

Show and Tell - Long Puff-Sleeved T


Its a dreary overcast day here today, 
not much else to do apart from add to Lil Misses wardrobe

Pattern: #2 "Kamomilla" T-Shirt from 1/2010 Ottobre Magazine

Fabric: Cotton knit from Spotlight......a rare find and good quality.
Though out of all the 30 types of fleece they had available, there were only 6 cotton knits at each store I had been to in the last month.....not much of a range. 
The red rib knit = a great opshop find :) 

I cut this out late last night, while I waited for the kettle to boil for my hottie bottle, thinking this would be a straightforward sew.
Not so.....as usual I decided to change a few elements...such as adding puff sleeves, widening the neck opening and making a mock... short sleeve over long sleeve style. 
This all added up to a day behind the sewing machine and a broken double needle.....that I only just replaced! 
But hey, it all resulted in one more garment finished and a lazy day sewing :)

Linking up with Leonie at Show and Tell


Thursday, June 20, 2013

The Start of a Winter Wardrobe


As I said in my last post, now that the wet, windy and cold weather has come, my main priority is sorting out  the kids winter wardrobe.

My little girls wardrobe has been in dire need of an overhaul for a while now, as a majority of it is suited for summer.

So there will be a few girly clothes to show in the next few weeks as I start to fill it with warm and cosy pieces and probably a couple of twirly skirts....just because!

The first on the list were a couple of easy leggings.


Pattern from my Ole Faithful: Ottobre 2010 Spring edition .....this magazine has well and truly paid for itself over the years....I have made so many clothes, and learnt so many new techniques using this magazine!

Just look at the pattern piece for these leggings.....there's just one, yet it's designed in a way that it adds interesting detail without any extras


Here's the start of the pleating!


Then once that's basted and sewn, the rest is so quick.  I had this polkadot pair cut and sewn together in two hours....probably would have been less if I hadn't chosen to do it just before the boys returned home from school, whining that they were hungry!


And I even did a bit of handmade upcycling for the first denim knit leggings.  Using my own handmade dress that I made a few years back....it had been hanging at the back of the cupboard for the while, so it was time to put all that material to good use....
now it'll get far more wear!

And a random side note: After taking these pics this afternoon, where I was making the most of the brief moment of sun, the neighbours dogs, frightened our sheep into the broken chicken coop ( the cows were the culprits this time ) so Mike ever being the opportunist decided to grab the large Wiltshire Ram to move it to the neighbours vacant property ( to get jiggy with some Wiltshire ewes ) but of course mid trying to drag this Ram ( he's huge ) I got roped into helping.....which is fine, except for the fact that I had been out today, and was wearing a skirt tights etc ( you get the idea ) and then the weather changed with a crack of thunder.....so imagine this:

Me driving the ride on, dolled up, skirt, tights, gumboots and all! 
While Mikes on the trailer, holding down a Ram almost the size of himself.....hightailing it up the road while the rain starts to pelt down and me desperately trying to hold my skirt down from showing the neighbours my choice of underwear! Oh and four kids hanging out the door, yelling out at us.....probably wondering what their crazy parents are laughing at!
The Neighbours were probably well entertained


Anyways I'll be linking up with Leonie at Show and Tell


Sunday, June 16, 2013

Matariki Blog Hop - Hottie Dog and Friends - Mini Hotwater Bottle Tutorial


Hi there and 'welcome' to anyone new to my little blog
My name's Laura, and I'm starting off week two of the 


..... Oh and ofcourse Hello again to my ole faithful readers! :)

When Juliet emailed me about this blog hop and asked me what does winter mean to you?  
I would normally think about my knitting and snuggling up infront of log fire...keeping dry from all the rain, occasional snow and freezing cold winds....
but of course the last two winters I've been enjoying a much more mild winter weather,  that's quite the opposite 
and much more like spring to me!
There's still the rain, wind and the knitting....
but this year I'm mainly thinking about the kids wardrobes, what items are missing, and making a sewing list to fill it.....followed by thinking about the outside and the long list of seeds I need to sow...
as I'd forgotten a garden in the north does not sleep!

But when asked what I project I would share, I did stumble for a while, until I remembered a project I had put off for the last couple of years.

My little girl was given a Mini Hot water bottle with a Dog cover when she was a baby....just a cheap thing, but it was the perfect size to warm her little body on cold nights, without the weight of a big Hottie.  And over the years, it got the nickname 'Hottie Dog'.

But Hottie Dog very quickly, started to split its seams, and legs worked their way loose and so on....till now, where he's now just hanging together by a few lingering threads!  
So that's where the idea of the Hottie Dog was born.


It's just taken, two years and a bit of nudging from Juliet for it finally come to fruition.

And of course what perfect timing with 
Maybe you would like to make one of these mini Hotties? 
I'm sure some little baby or toddler would love to snuggle up to one this winter


So here's what you need to make one of these: 

First download my Mini Hottie Dog Pattern here

For the material:
  • Either a couple of op-shopped woolen jerseys/cardigans, feltable or not (something suitable for a hottie cover)....or alternatively you could use fleece.....but as long as the material has some stretch the options are endless.
  • Small pieces of cotton or scrap jersey knit fabric for tummy, snout and ears.
  • Some polyester and wool stuffing for the head and snout

For embellishment: 

  • Tiny pieces of felt for eyes, nose and tongue
  • Embroidery thread, black and white for eyes
  • And coordinating thread for all fabrics.
Lets get started!
Cut out all the pattern pieces and starting with the body and head piece join them together where stated on pattern

*Also note that the snout and the tummy piece need to be cut and glued on to thin cardboard ( cereal box will be ideal )


Now its time to cut!

Start with cutting out the back pieces.
Using the rib or hemline of the woolen jersey, cut the two back pieces as shown.


If you're using fleece, cut these pieces longer to allow for a hem

Cut one front piece

Pin or trace around the legs and arms ( I use a fabric pen to trace ) 
Don't forget to cut four, pattern facing right side up, 
then flip the pattern over and cut the other four.....
so you end up with mirror images.  


To cut the ears do the same, (flip the pattern) this time cutting two from a coordinating knit or cotton fabric.  
Also this is where you can change your dog to a rabbit or bear.  For the Rabbit, make the ears narrower, and pointed, and for the Bear, just use the leg/arm as the pattern piece....just shortened.

Now cut the lining pieces for the head, out of some scrap knit or something stretchy that is thin....so that it doesn't add to much to a bulky seam

For the snout and the nose, cut around the cardboard piece, leaving a rough seam allowance. 
And using a running stitch, stitch around the edge 


Then pop the cardboard back in and pull the thread. Secure thread


Press with an iron....then pop out the cardboard, and press again.

Cut the nose, and tongue out of felt, and using the pattern as a guide.... stitch the nose in place with either blanket stitch or slip stitch.....then embroidery the mouth with six strands of embroidery cotton in your chosen colour.
Stitch tongue in place, which is optional

Now pin snout and tummy piece on to the front piece, again using the pattern as a guide.

Slip stitch or blanket stitch pieces down, leaving a small gap for stuffing in the snout.  I start at the bottom and leave the thread and needle in place once I get to the other side...so I can close this later.


Cut the eyes out of felt, and stitch in place....this is where you can change the look of your Animal Hottie, by changing the shape of the eyes, layering on white felt and adding lashes, and white flecks  (with embroidery floss) in the pupils
  Also placement changes the look too!  Have fun!!


Sew the arms, legs and ears, using a 1/4" seam allowance.
  Turn the right side out.

With front piece right side up, and using pattern as guide,
pin arms and legs in place.  
I place the arms so they will be shorter than the legs.


  Baste these with  sewing machine, with the seam allowance..... I know it seems a step you can skip.... 
but you'll thank me later if you do it...
as you'll be sewing through many more layers to come.


Pin back top piece and sew with a 1cm seam allowance.

 TIP!  Use a ballpoint needle to make it easier, and this could be a good time to get out your walking foot if you have one....if not don't worry....I got by without mine!

One at a time, pin and sew lining in place on either side of the head.  This will encase the stuffing.


Now pin and sew the back bottom piece.  Once you have finished, have a look and if you have any wonky seams, now is a good time to sew around one more time to fix them.


Don't be confused by the photo, it was taken before I sewed it together


Trim seams. 
TIP! I trim the out seams lower the the middle seams....this reduces the bulk of the seam, and helps it sit better.
it's a couture technique I learnt recently

Turn right side out and admire!
You're nearly there!!!


Now it time to stuff the snout.....not to much! Then using the needle and thread you left in place....sew the hole closed.

Now stuff the head.... again don't overstuff....I have to re-do my Rabbit..
Using a thread that matches the body, back stitch the linings to the wrong side of the front, and top back piece respectively in a circular shape. Just try to catch the fabric so that it doesn't show too much on the right side.


Now the ears. Turn the seam allowance inside, and attach to the head.  Again like the eyes, you change the whole look, by placing the ears at different places
 I use the ladder stitch to attach them, and stitch around twice...as no doubt, this is the likely part a little child will carry the hottie around with!

  
For the Bear ears, I stitched them closed first, then gathered the base of the ear before attaching to the head.

And thats it!!!Congratulations for getting to the end of this looooong tutorial! 


They're pretty cute, and with the padded head....they're great to snuggle without feeling the hard neck of the hottie!


And around here, they already have a fan! 


But she can't have them all! 
So Mr Bear and Miss Rabbit will be flying their way to Christchurch where they'll keep some other kidlets warm :)

And if you want to send some too.....please do....
  see more info here


Friday, June 14, 2013

Conquering Crochet Friday - I've hit a stumbling block!


So.....so far I've had a pretty good run with this crochet journey....
but this week has been another story altogether.

Feeling pretty confident in my newly learnt skills, I decided to try my hand at this beret

I thought surely it couldn't be that hard, afterall it's just crocheting in a circle....a bit of increasing and then decreasing.
The only part I had to master was the bobble stitch.....
sweet! I thought, I can DO this!!


Or not.

Yip first major hurdle!

So maybe it looks okay....but it's not sitting right....it has it's own wave effect going on, despite starting with a magic loop.....and the bobble stitch isn't looking the way I'd like it too.
I had to change the hook size from a 4mm to a 5mm just so I could actually complete the stitch!
Before that it was a nightmare and had I started the beret 4 times over, each time changing either the wool or the hook size before I got this far.

Conclusion:  I put this down to a FAIL, and while it is still intact in my knitting bag,  I will be unravelling it!
 as I know I'll never be happy with the finished project if I don't.

Sooooo moving on.....it's time to dream
maybe of some simple more achievable projects....


These are made by repeatcrafterme blog

I already have a few of these purse frames, 
I'm sure something like this is achievable
heres the link to the pattern on etsy here

I've had these stash baskets in my Ravelry favourites for ages!


And now I reckon I probably could actually make them!

and another one hiding in my favourites! 


Or maybe I should get a head start on Lil Misses birthday and make something like this cute rabbit

Bronwen the pattern


Thursday, June 13, 2013

Matariki Crafting Blog Hop


Okay so I'm a bit behind the eight ball at the moment.....
have you heard about the blog hop that's happening at the moment


The lovely Juliet from Tartan Kiwi has gathered a bunch of NZ bloggers to entice and inspire you into getting creative this Winter...

I'm a bit behind in telling you about it as there have already been a couple posts to get you started....
aaaand, so you know the where and when, the following is the talented line up bloggers with dates..
 
Tuesday 11th June- Lisa - Big Little
Wednesday 12th June - Louana - NZ Green Buttons
Thursday 13th June - Stella - The Golden Adventures of a Very Dark Horse

We'll have a wee break over the weekend so you can catch up on anything that you missed!

Monday 17th June - Laura - HOOTNZ
Tuesday 18th June – Rhiannon - Toast and Life
Wednesday 19th June - Dee - Dee*Construction
Thursday 20th June – Miriam – Create Hope Inspire
Friday 21st June - Leonie – Sunshine x 3

Another break over the weekend

Monday 24nd June - Roz - Squiltz
Tuesday 25d June – Holly- Hollymayb
Wednesday 26th June - Juliet- Right here! Final round-up and Linky Party!!!

Wednesday 10th July- Linky Party Closes
Friday 12th July- Prize winners announced
 
Did you spot that last date.....yes there are prizes folks!
You can join in too! 
Afterall, it's all about inspiring everyone to get creative.
There will be a linky party that you can add any winter projects you've been busy creating.....see more info here
 
As for me, I've been busy in the garden.....Mike and I have been getting ready for planting, and this year there will be a big batch of garlic!!
 
 Winter this year is quite the opposite to what I would have been doing two years ago.....instead of getting dirt under my fingernails, I would have been rugged up on the couch sitting infront of a fire all the while, looking out at a bleak dead garden 
Tuesday 11th June- Lisa - Big Little
Wednesday 12th June - Louana - NZ Green Buttons
Thursday 13th June - Stella - The Golden Adventures of a Very Dark Horse
We'll have a wee break over the weekend so you can catch up on anything that you missed!
Monday 17th June - Laura - HOOTNZ
Tuesday 18th June – Rhiannon - Toast and Life
Wednesday 19th June - Dee - Dee*Construction
Thursday 20th June – Miriam – Create Hope Inspire
Friday 21st June - Leonie – Sunshine x 3
Another break over the weekend
Monday 24nd June - Roz - Squiltz
Tuesday 25d June – Holly- Hollymayb
Wednesday 26th June - Juliet- Right here! Final round-up and Linky Party!!!
Wednesday 10th July- Linky Party Closes
Friday 12th July- Prize winners announced
- See more at: http://craftandnappies.blogspot.co.nz/2013/06/matariki-crafting-and-so-it-begins.html#sthash.YRWNoGa3.dpuf
Up in the winterless north, winter is so different,
Tuesday 11th June- Lisa - Big Little
Wednesday 12th June - Louana - NZ Green Buttons
Thursday 13th June - Stella - The Golden Adventures of a Very Dark Horse
We'll have a wee break over the weekend so you can catch up on anything that you missed!
Monday 17th June - Laura - HOOTNZ
Tuesday 18th June – Rhiannon - Toast and Life
Wednesday 19th June - Dee - Dee*Construction
Thursday 20th June – Miriam – Create Hope Inspire
Friday 21st June - Leonie – Sunshine x 3
Another break over the weekend
Monday 24nd June - Roz - Squiltz
Tuesday 25d June – Holly- Hollymayb
Wednesday 26th June - Juliet- Right here! Final round-up and Linky Party!!!
Wednesday 10th July- Linky Party Closes
Friday 12th July- Prize winners announced
- See more at: http://craftandnappies.blogspot.co.nz/2013/06/matariki-crafting-and-so-it-begins.html#sthash.YRWNoGa3.dpAs for me I've been busy in the garden, Mike and I have been getting it ready for more planting and the this year the garlic!It's so different here, ever since we swapped the snow and log fires for the winterless north, during winter, the garden is calling....
 seedlings are coming up everywhere, and with the rain, the dreaded Kikuyu grass is creeping in from the edges.....
and there's no frost in site!

So right now after a productive day, I'm sittting back nursing my sore muscles, and feeling pretty chuffed with myself for making a dent.

And while I'm relaxing, I'll also be catching up with the weeks Matariki blog hop so far!

Thursday, June 6, 2013

Conquering Crochet Friday - The Boys Turn


So this week was all about my boys
It was their turn to get a pair of slippers


So using the same pattern as their sisters slippers
I started modifying the pattern....winging it! basically


The above pair, I used a 4mm hook, and kept increasing the foot in pattern....then back and forth....it worked...but it was slow with all that half double crochet...so for the rest of the foot I used double crochet......these are okay-ish...a bit baggy...but he's happy

By the time I got to the second pair, I thought I'd double the yarn and use a huge hook - 9mm!


These were fast!! Like in a evening fast!.....but as you can see a bit on the holey side....like...'big toes starting to poke through' side! 

But hey, I liked how quick these were to make....so I kept going, and a third and final pair were made - 2 hours!


This time I modified and played around with the look, since the lady who made the pattern contacted me and showed me this more masculine pair for the boys......I'm sure though there is a way I could have done it better.....but it works....even if it is a bit holey.

But the best part of owning a pair of these...
is making a running jump and 
slipping and sliding around the kitchen floor
Which is a sight in it's own right! Considering the size of my kitchen and the three boys trying all to slide at once!

So I guess regardless of the bagginess and holeyness, these were a success....and last night the boys wore them to bed....so they also make great bed socks too!

And since it's all about the boys,
 here are some neat patterns with them in mind

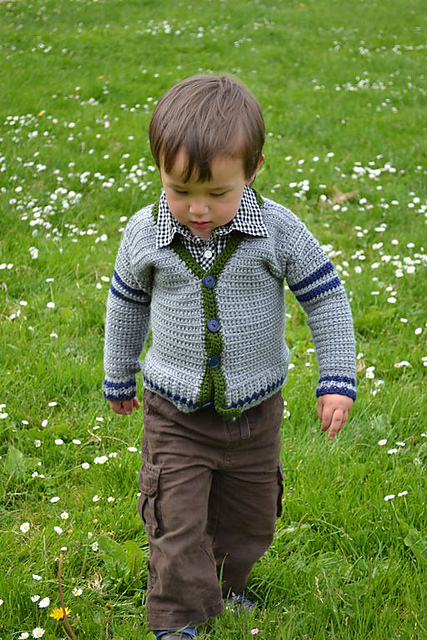
First this cute little cardigan


And then this one, which apparently is a great stepping stone from crocheted scarves and squares


Then there is the must have skater boy beanie

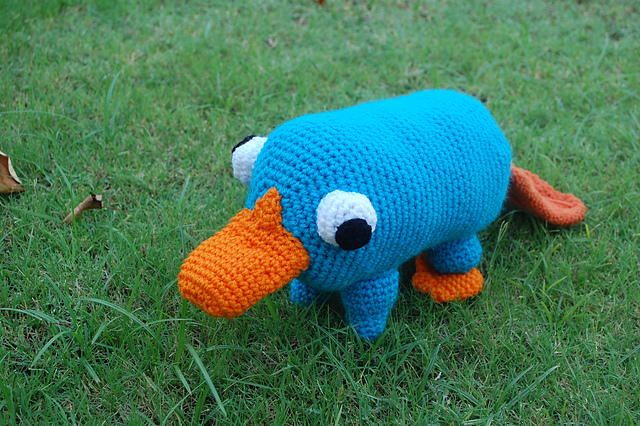
Oh and this plushie would just make my eldest boys day!


And this is a bit random, but when I typed in a search for boys and crochet, this awesome fire blanket came up....so I just had to share!

Show and Tell - Shorts, Shorts and More Shorts


7 Boys Shorts finished...Phew!!!


Two each for the eldest two, and three for my youngest


Some with pockets and some without...


Alot of mixing and matching to eeek out the fabric yardage....
but I like that look


And even a pair that I made to my eldest's design...(they love to be involved)


So there you go, seven pairs to replace their depleting wardrobe supply as they grow out of, split seams and rips holes out of a very worn out selection of hand me downs.

I have a long list of items I need to replace, and slowly but surely everytime I hang out another wash load of clothes, the homemade clothes are slowly taking over....it's such an awesome feeling counting the items I made with my own hands, hanging on the line!

And is it me or do store bought clothes fall apart far too quickly?? 
I suspect the stitch length....
some are almost close to a basting stitch! 
I'm over it....and at $6-8 materials cost per short, it's well and truly worth my time :))

Linking in with Leonie at Show and Tell


and 


Related Posts Plugin for WordPress, Blogger...